23 Christmas Light Ideas That Look Like You Hired a Professional
Professional Christmas Light Ideas. There’s a clear difference between a house that looks professionally lit and one that looks like lights were draped wherever they’d reach. It’s rarely about how many lights you have; it’s about color temperature consistency, spacing precision, and which architectural lines you choose to highlight versus skip. Professional installers follow a handful of repeatable rules that most homeowners never learn, because nobody explains them; they just show up and do the work. This list breaks down 23 of those exact ideas so you can get the same polished, cohesive look without paying installer rates.
This post contains affiliate links. As an Amazon Associate, I earn from qualifying purchases. If you buy through these links, I may earn a small commission at no extra cost to you.
What Ties These Ideas Together
Every idea on this list connects back to one core principle: restraint and consistency read as “professional,” while variety and improvisation read as “homemade,” even when the homemade version technically has more lights. Professional crews pick one bulb color temperature and stick to it across the whole house; they follow existing architectural lines instead of inventing new ones, and they hide every visible wire and clip. Keep that filter running as you go through this list for each idea; ask whether it’s adding a cohesive layer or a competing one.
1. Commit to One Color Temperature House-Wide
The single biggest tell of an amateur setup is mixing warm white, cool white, and multicolor lights across different sections of the same house. Professional installers pick one temperature, almost always warm white in the 2700K range, and use it everywhere, from roofline to shrubs to wreaths. This consistency is what makes a house read as one cohesive design rather than several unrelated decorating decisions stacked on top of each other, and it costs nothing extra to plan for since it’s simply a matter of buying matching bulbs from the start.
2. Outline the Roofline, Not Just the Gutters
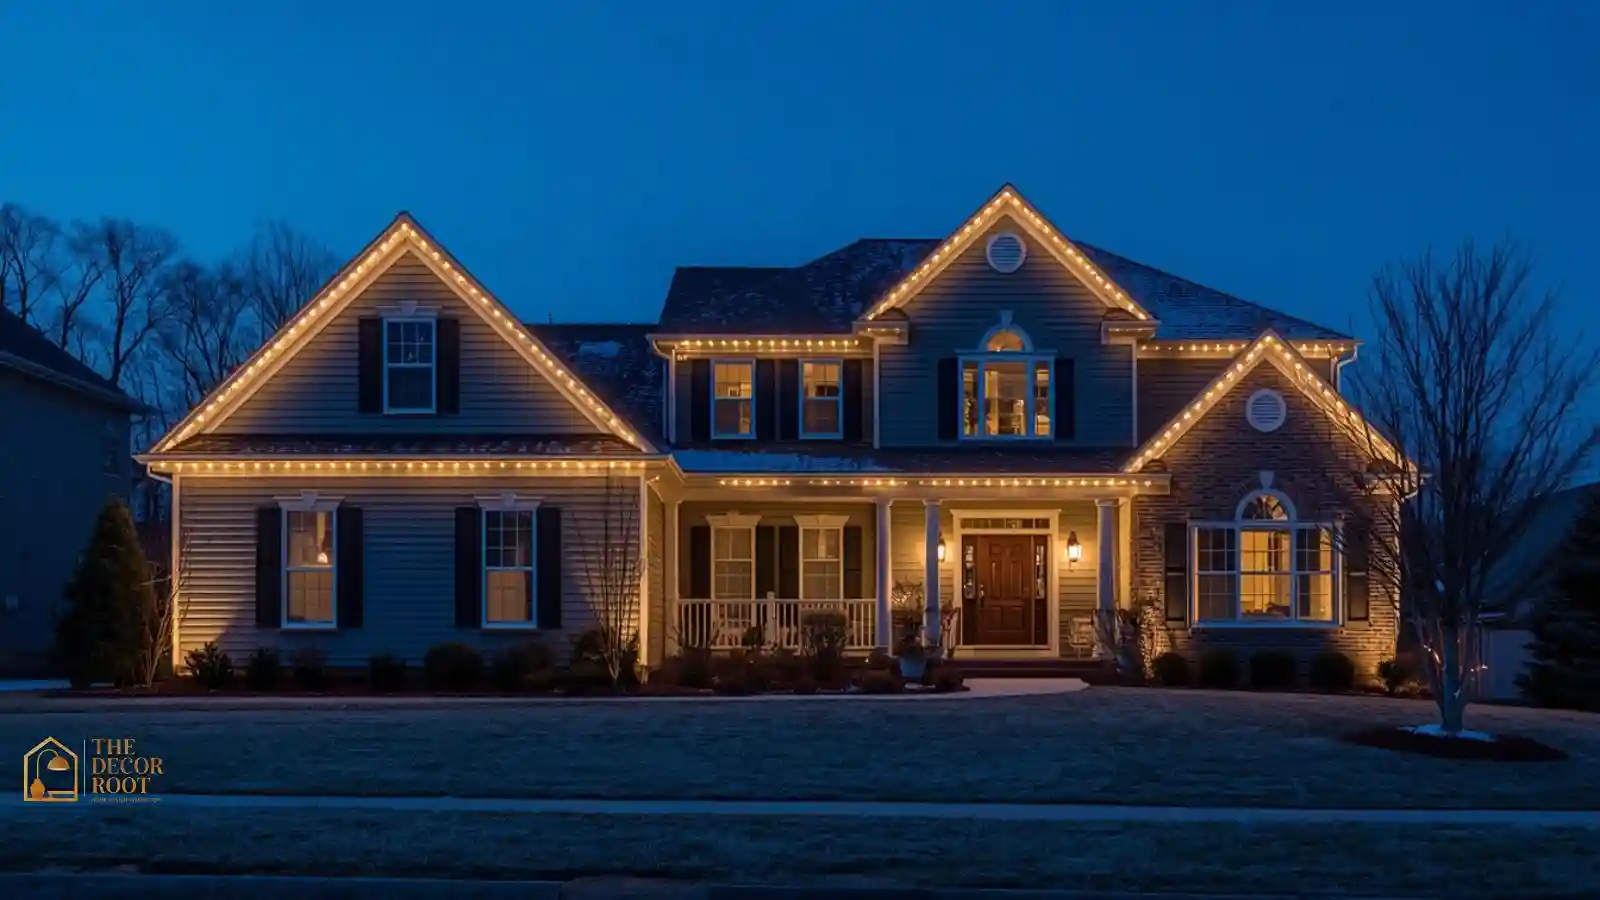
Rather than clipping lights only along the gutter edge, professional installs typically follow the actual roofline, including gable peaks and any architectural angles, so the lights trace the shape of the house itself. This creates a more dimensional, architectural silhouette after dark instead of a single flat line. It takes more clips and slightly more time, but it’s the difference between a house that looks lit and a house that looks illuminated by design.
3. Use Warm White Icicle Lights Sparingly
Icicle lights can look stunning or can look cluttered depending entirely on restraint. Used along a single roofline or porch overhang with consistent drop lengths, they mimic real icicles and add dimension. Used everywhere at once roofline, windows, and railings simultaneously they start to visually compete with each other. Pick one or two zones for icicle lights and keep the rest of the house in flat string lights for contrast.
4. Wrap Porch Columns in a Tight, Even Spiral
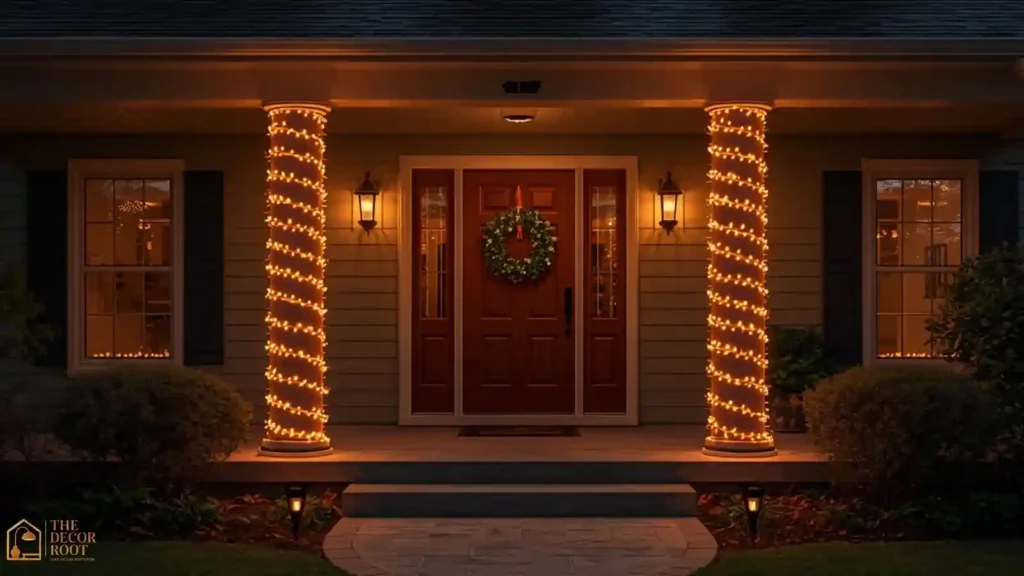
A loosely wrapped porch column with visible gaps reads as rushed. A tightly, evenly spiraled wrap professionals typically use one wrap every two to three inches creates a solid glowing column effect that looks deliberate from any angle. Starting and ending the wrap at the same point (top or bottom) on every column also keeps the whole porch symmetrical, which matters more to the overall polished effect than most people expect.
5. Start With True C9 Bulbs for a Classic Look
Professional Christmas light designers frequently default for rooflines and porches because the larger, rounder bulb shape reads as classic and substantial from the street in a way that smaller mini lights simply don’t at a distance. C9s are also significantly more energy-efficient in LED form than the incandescent versions many people remember, meaning you can run considerably more of them without tripping a breaker or spiking your electric bill through the season.
EDITOR’S PICK
🛒C9 Warm White LED String Lights
C9 LED lights offer professional‑grade, street‑visible size and energy savings that let you run more without breaker issues.
(paid link)
6. Add Pathway Stake Lights for Symmetry
Matching pathway stake lights placed at even intervals along a walkway extend the lighting design from the house down to the street, creating a complete, guided approach rather than a house that’s lit but surrounded by darkness. Professional installs treat the walkway as part of the overall composition, not an afterthought, and even spacing here matters just as much as it does on the roofline.
7. Uplight Trees Instead of Wrapping Every Branch
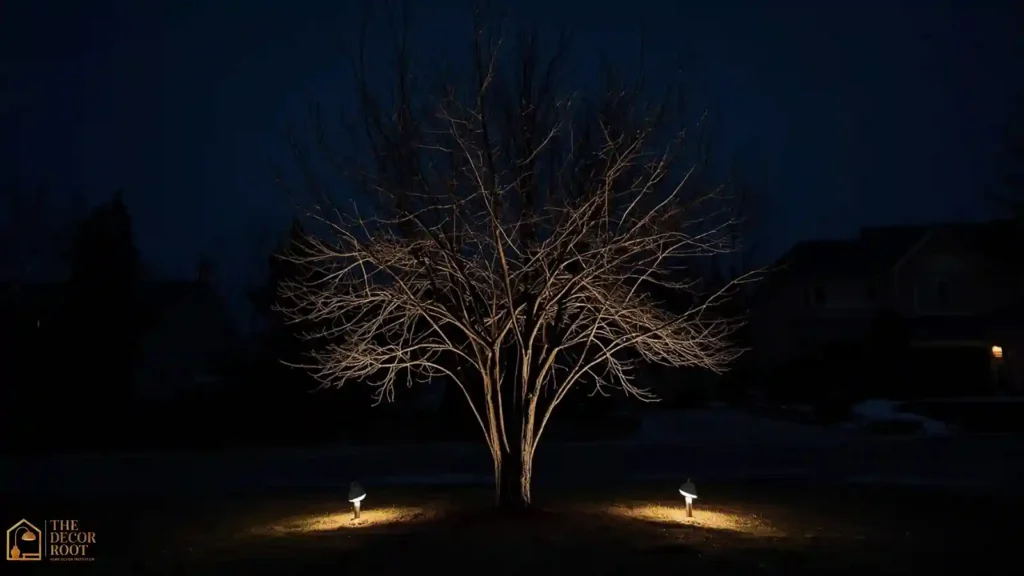
Rather than wrapping every branch of a front-yard tree (which can look busy and takes hours), professionals often place a few ground-mounted uplights at the base aimed upward into the canopy. This creates a dramatic glow effect with a fraction of the labor and product cost, and it works especially well on trees with interesting bare branch structure in winter, since the light catches and defines the silhouette rather than blanketing it.
8. Use Warm White Net Lights on Shrubs and Hedges
Draping loose string lights over shrubs tends to leave visible gaps and clumped sections. Net lights, designed specifically to lay flat over bushes and hedges, give even, consistent coverage in a fraction of the time and avoid the “clumped in one corner” look that’s common with standard strings on rounded shrubs.
9. Keep Multicolor Lights to One Small, Intentional Zone
If you love the look of multicolor lights, professional designers will often isolate them to one small, intentional feature a single small tree, a wreath, or a section of railing rather than mixing them throughout an otherwise warm-white house. This lets you keep the playful color element without undermining the cohesive look of the rest of the display.
10. Automate Everything With a Timer
Manually turning lights on and off every night is both inconvenient and inconsistent; some nights they go on late, and some nights someone forgets entirely. takes this decision away from you completely, running your display on the same schedule every single night without fail, which is exactly the kind of quiet consistency that makes a display feel intentional rather than haphazard.
EDITOR’S PICK
🛒Outdoor Timer Smart Plug (Weatherproof)
Automates your display schedule consistently every night
Eliminates late turn-ons and forgotten switch-offs
Keeps your setup running like clockwork without daily effort
(paid link)
11. Frame Windows With a Thin Light Border
Outlining window frames with a single thin line of warm white lights adds architectural definition after dark, echoing the roofline treatment on a smaller scale. This is a detail most amateur setups skip entirely, and it’s one of the fastest ways to make a house look more thoroughly, deliberately designed rather than just having lights on the eaves.
12. Light the Wreath Itself, Not Just Around It
A wreath with its own integrated warm white lights ties directly into the house’s lighting scheme instead of sitting as an unlit daytime-only object once the sun goes down. This small addition means your front door stays a focal point at night as well as during the day, which matters since most neighborhood light-viewing traffic happens after dark.
13. Choose a Single Focal Tree for a Lit Mini Tree Display
Rather than lighting every tree and shrub in the yard equally, professional designs typically pick one focal tree, often near the front door or driveway entrance, and give it a denser, more elaborate light treatment than everything else. This creates a clear visual hierarchy, guiding the eye to one showpiece instead of spreading attention evenly and diluting the overall impact.
14. Add Curtain Lights Along a Porch Overhang
Curtain lights, which drop in even vertical strands from a horizontal line, create a soft, glowing “light curtain” effect along a porch overhang or pergola that reads as considerably more custom and higher-end than standard string lights. They work particularly well paired with an entryway that already has good architectural bones, since the vertical lines echo columns or railings.
15. Cover Bare Shrubs With Warm White Net Lights
For shrubs specifically sized to smaller foundation shrubs, coverage is even more critical than on larger hedges, since gaps are far more visible on a compact plant. Look for connectable net light sets so an entire foundation planting bed can run off a single outlet without a tangle of separate cords, which also keeps the whole setup looking cleaner and more deliberate.
EDITOR’S PICK
🛒Warm White Outdoor Net Lights, Connectable
Connectable net lights let you cover compact foundation shrubs from a single outlet, avoiding gaps and cord tangles.
(paid link)
16. Spotlight Architectural Features Directly
A single well-placed spotlight aimed at a distinctive architectural feature a dormer, an arched doorway, a stone chimney draws attention to the parts of your home’s design that are easy to overlook in daylight. This is a technique borrowed directly from professional landscape lighting rather than holiday lighting specifically, and it adds a layer of sophistication that pure string-light displays don’t achieve on their own.
17. Use Lit Topiaries as Entry Bookends
A matching pair of pre-lit topiary trees or spiral evergreens flanking the front door creates instant symmetry and a polished, boutique-hotel-entrance feel. Because they’re identical on each side, they read as a single considered design decision rather than incidental decorating, and they work well even on homes with minimal existing landscaping to build a display around.
18. Add Warm Lantern-Style Lighting Along the Path
Battery or solar lantern-style lights placed along a front walkway add a softer, more ambient light layer than string lights alone, and the flicker-effect LED versions in particular mimic real candlelight convincingly enough to add real warmth to an entryway. This layering of light types string, spotlight, and lantern is part of what separates a fully designed display from a single-source one.
19. Keep Every Extension Cord Hidden or Routed Along Edges
Visible cords running across a lawn or along a walkway instantly undercut an otherwise well-planned display. Professional crews route cords along fence lines, garden bed edges, or buried cord protectors specifically so nothing is visible from the street. Taking the extra ten minutes to tuck and secure cords is one of the least glamorous but most impactful steps on this entire list.
20. Add a Dusk-to-Dawn Sensor for Effortless Consistency
Pairing your timer with a dusk-to-dawn sensor means your display automatically adjusts to the actual sunset time each evening rather than a fixed clock setting, which drifts out of sync with real daylight as the season progresses. This is the exact kind of detail that professional installers build into every job and that most DIY setups skip, and it means your lights are never on in daylight or off right as it gets dark.
EDITOR’S PICK
🛒Dusk-To-Dawn Light Sensor Outdoor Plug
Dusk-to-dawn sensor + timer automatically adjusts to seasonal sunset times, keeping lights on exactly when needed.
(paid link)
21. Add Garland With Built-In Lights to Railings
Pre-lit garland wrapped along porch railings gives you greenery and light in a single pass, keeping the railing detail consistent with the rest of the house’s warm-white theme without a separate wiring step. Look for battery- or plug-in garland with lights already embedded evenly along the strand, rather than adding a separate string of lights on top of plain garland afterward, which tends to bunch unevenly.
22. Balance Symmetrical Placement Across the Facade
Whenever your home’s architecture allows it, mirror your lighting choices left-to-right across the front facade, matching tree treatments, matching window outlines, matching shrub coverage. Symmetry is one of the fastest visual cues the brain uses to register something as “designed” rather than “decorated,” and it works even on homes that aren’t perfectly symmetrical to begin with, simply by balancing the visual weight of lights on each side.
23. Do a Nighttime Walkthrough Before You’re Done
The final professional-level step is one almost nobody does: after finishing the install during daylight, go stand at the curb after dark and actually look at the finished result the way a passerby would. This is when uneven spacing, visible gaps, or mismatched color temperatures become obvious in a way they never are in daylight, and it’s the single easiest way to catch and fix the issues that separate a good display from a great one before anyone else sees it.
For more ways to layer this same polished approach across your whole exterior, see our guides on Christmas wreath ideas and budget Christmas curb appeal.
Quick Action Plan
- If you’re starting from scratch this weekend, prioritize in this order: pick one warm-white color temperature for the entire house, outline the roofline first since it has the biggest visual impact, add a timer so the schedule runs itself, and do a nighttime walkthrough before calling it finished.
- Those four moves alone will put your display ahead of the majority of homes that skip straight to buying more lights instead of planning the layout.
Frequently Asked Questions
Conclusion
Looking professionally lit has less to do with budget and more to do with consistency, one color temperature, clean lines, hidden cords, and a final nighttime check. Start with two or three ideas from this list rather than all twenty-three at once, and build from there each season.
💾 Save this to your Christmas Lights Pinterest board so it’s ready when you start planning your display.