
24 DIY Christmas Ornaments That Look Store-Bought (Not Homemade)

If you’ve ever stood in the ornament aisle wincing at $12 for a single glass ball, you already know the real problem with holiday decor: the pretty stuff is expensive, and the cheap stuff looks cheap. Over at our full holiday decorating archive, we’ve tested dozens of budget-friendly Christmas projects, and these 24 DIY Christmas ornaments are the ones that consistently fool people into asking where you bought them. No glitter explosions, no glued-on pom-poms that scream “craft night.” Just simple techniques that produce a genuinely elevated, boutique-shelf look for a few dollars an ornament.
This post contains affiliate links. As an Amazon Associate, I earn from qualifying purchases. If you buy through these links, I may earn a small commission at no extra cost to you.
The Real Reason This Works
The ornaments that look expensive rarely rely on complicated skills; they rely on restraint. Boutique brands lean on a tight color palette, one or two textures per piece, and a finish that looks intentional rather than busy. If you want that same effect at home, browse all our seasonal decorating ideas for more projects built around this same “less but better” principle, then apply it here: pick three colors max, one dominant texture (velvet, matte paint, or glass), and stop before you’re tempted to add “just one more thing.” That single mindset shift is what separates a homemade-looking ornament from one that could sit in a $40 boutique box.
1. Frosted Cranberry Branch Glass Ornaments
Fill a clear glass ball with a small cluster of faux cranberry branches before sealing the top with a coordinating cap. The trick to the expensive look is proportion: use branches sized so they fill about two-thirds of the ball, not the whole thing, so light can still pass through the glass. Lightly mist the outside with matte frosting spray (sold for holiday crafts) to diffuse the branches into a soft, dreamy silhouette instead of a sharp, cluttered one. This single ornament reads as a designer piece because it mimics the “nature caught in glass” look that high-end brands charge a premium for, using materials that cost under a dollar per ornament when bought in bulk.
EDITOR’S PICK
🛒Frosted Cranberry Branch Glass Ornaments
Fill a clear glass ball with a small cluster of faux cranberry branches before sealing the top with a coordinating cap.
(paid link)
2. Velvet Ribbon-Wrapped Ball Ornaments
Wrap a plain foam or glass ball tightly in half-inch velvet ribbon, securing each wrap with a dot of hot glue hidden on the underside. Work in a single continuous spiral rather than overlapping randomly; that consistency is what makes it look manufactured rather than crafted. Deep jewel tones like emerald, burgundy, or sapphire velvet photograph beautifully and add real texture variety to a tree that’s otherwise all shiny glass. Finish the top with a small gold cap or a short loop of matching ribbon so the hanging point disappears into the design instead of looking like an afterthought.
EDITOR’S PICK
🛒Velvet Ribbon-Wrapped Ball Ornaments
Wrap a plain foam or glass ball tightly in half-inch velvet ribbon, securing each wrap with a dot of hot glue hidden on the underside.
(paid link)
3. Dried Orange Slice Ornaments with Gold Trim
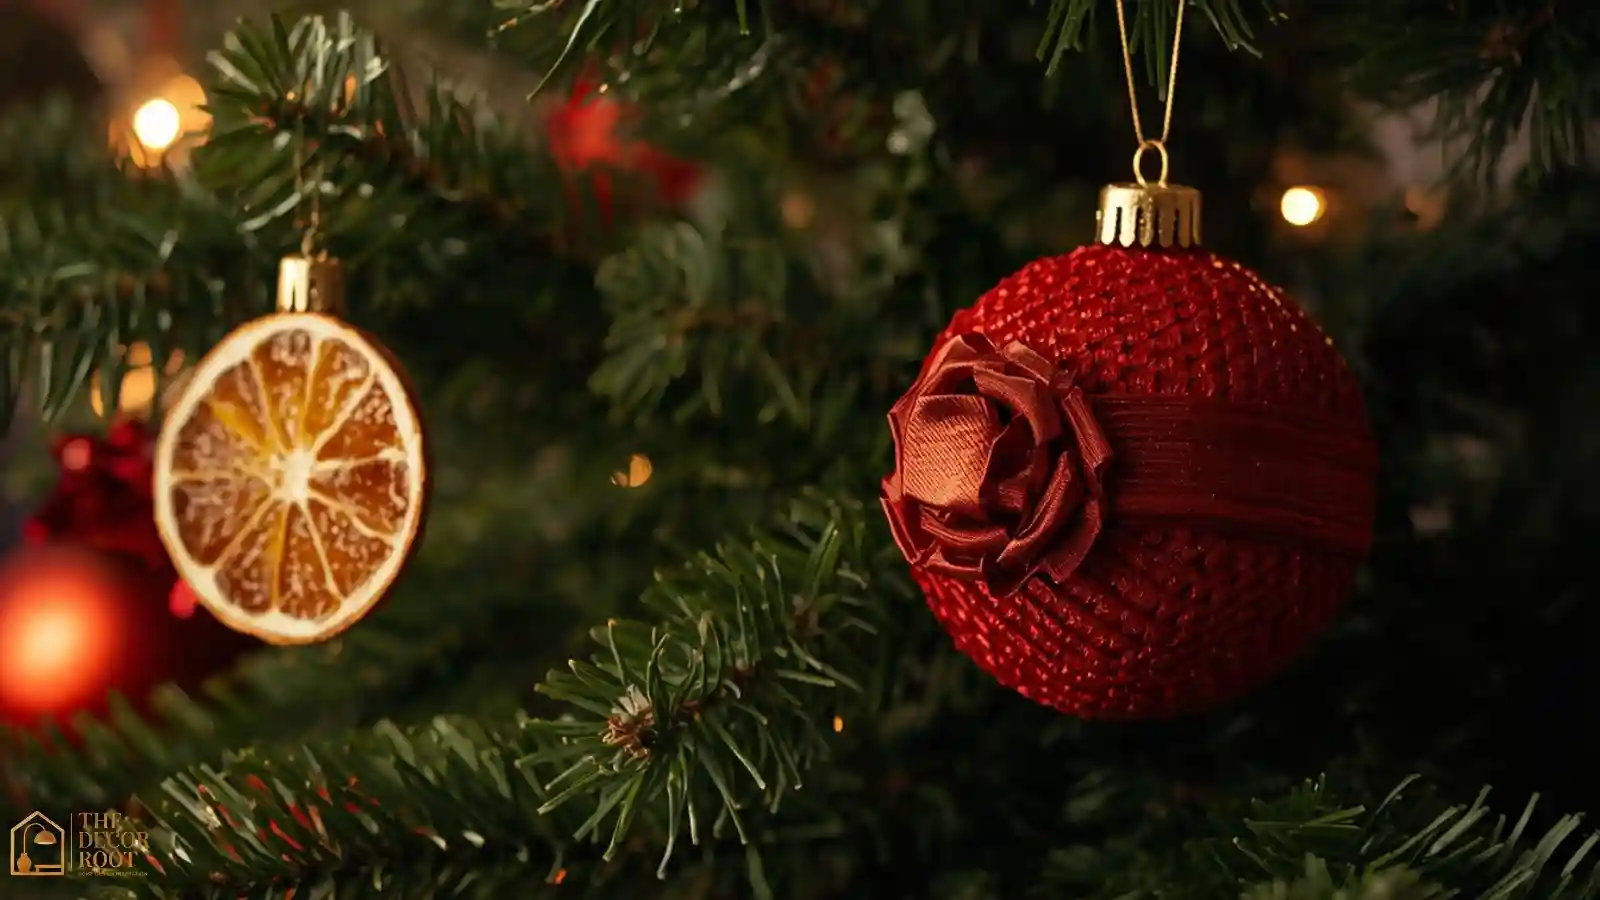
Dehydrate thin orange slices in a low oven for 3–4 hours until leathery but not brittle, then punch a small hole near the rind for hanging twine. Once dry, paint just the outer rind edge with a thin line of gold liquid leaf or metallic paint pen; this small detail is what elevates it from a rustic craft-fair item to something that looks curated. Hang with plain jute twine for a natural, farmhouse-adjacent look, or swap in thin gold cord for a more formal tree. These smell faintly of citrus and clove if you add a light cinnamon dusting before drying, which is a nice bonus for anyone styling a scented tree.
EDITOR’S PICK
🛒Dried Orange Slice Ornaments with Gold Trim
Dehydrate thin orange slices in a low oven for 3–4 hours until leathery but not brittle, then punch a small hole near the rind for hanging twine.
(paid link)
4. Painted Faux Marble Ornaments
Fill a glass ball about a quarter full with white acrylic paint, then add a few small drops of black or gray paint and swirl by rotating the ball slowly in your hands. Pour out the excess onto a paper towel and let the ball dry upside down in an egg carton overnight. The uneven, veined pattern this creates mimics real marble far more convincingly than most people expect from a five-minute technique. Cap with a plain silver or gunmetal top for a look that fits seamlessly into a modern, moody, or Scandinavian-inspired tree, and pairs surprisingly well with warm wood ornaments too.
EDITOR’S PICK
🛒Painted Faux Marble Ornaments
Fill a glass ball about a quarter full with white acrylic paint, then add a few small drops of black or gray paint and swirl by rotating the ball slowly in your hands.
(paid link)
5. Beaded Wire Snowflake Ornaments
Twist 20-gauge silver wire into a simple six-point snowflake shape, then thread small clear or iridescent glass beads onto each arm before crimping the ends. Keep the design asymmetrical and organic rather than perfectly geometric; a slightly imperfect snowflake reads as handcrafted luxury, while a too-perfect one can look plastic and cheap. These catch light beautifully near a window or string of white lights, and because the materials are so lightweight, you can make a dozen in under an hour once you get the wire-bending technique down.
EDITOR’S PICK
🛒Beaded Wire Snowflake Ornaments
Twist 20-gauge silver wire into a simple six-point snowflake shape, then thread small clear or iridescent glass beads onto each arm before crimping the ends.
(paid link)
6. Embroidery Hoop Framed Ornaments
Stretch a small scrap of plaid, velvet, or metallic fabric over a 2-inch embroidery hoop, trimming the excess close to the frame. Add a tiny sprig of faux greenery or a single dried flower glued to one edge of the hoop for a finished, styled look rather than a bare frame. The embroidery hoop shape itself immediately reads as “boutique farmhouse decor” because it mimics a popular home-goods aesthetic that’s genuinely trending in stores right now. Loop a thin ribbon through the hoop’s hardware for hanging, and consider making several in coordinating fabrics for a cohesive cluster on one branch.
EDITOR’S PICK
🛒Embroidery Hoop Framed Ornaments
Stretch a small scrap of plaid, velvet, or metallic fabric over a 2-inch embroidery hoop, trimming the excess close to the frame.
(paid link)
7. Gold Leaf Splatter Glass Ornaments
Using a small dry paintbrush, flick tiny drops of gold acrylic paint onto a clear or lightly frosted glass ball, working over a covered surface to catch overspray. The key to making this look intentional rather than messy is restraint; three or four light passes of the brush are usually enough, and less is genuinely more here. Let each layer dry for a few minutes before adding the next so the drops stay crisp instead of smearing. The finished effect mimics constellation-style ornaments sold at high-end retailers for $18–$24 each, and a dozen of these together look stunning grouped on one section of the tree.
EDITOR’S PICK
🛒Gold Leaf Splatter Glass Ornaments
Using a small dry paintbrush, flick tiny drops of gold acrylic paint onto a clear or lightly frosted glass ball, working over a covered surface to catch overspray.
(paid link)
8. Mini Wreath Ornaments with Wired Ribbon
Bend a small circle of floral wire into a 3-inch ring, then wrap it tightly with faux boxwood or eucalyptus stems using floral tape to secure. Tie a tiny wired ribbon bow at the bottom in a color that complements your tree’s palette, keeping the bow proportional and small rather than oversized. These mini wreaths add dimension and a sense of “real greenery” to a tree that might otherwise be all glass and metal, and they’re sturdy enough to double as gift tag decorations if you want to repurpose a few. If your mantel and staircase need the same wired-ribbon treatment at a larger scale, our DIY Christmas garland ideas for stairs and mantels walk through the same technique. Making a batch of six to eight at once is efficient once your materials are laid out.
EDITOR’S PICK
🛒Mini Wreath Ornaments with Wired Ribbon
Bend a small circle of floral wire into a 3-inch ring, then wrap it tightly with faux boxwood or eucalyptus stems using floral tape to secure.
(paid link)
9. Vintage Button Cluster Ornaments
Glue a cluster of mismatched vintage-style buttons in cream, brass, and muted red tones onto a small wooden disc or felt circle base, layering them so edges slightly overlap. This works because it borrows from the “collected over time” aesthetic that’s genuinely difficult for mass-produced ornaments to replicate; buyers pay extra for things that look like they have history. Add a small loop of twine or thin ribbon through a hole at the top for hanging. Thrifted or inherited buttons work best here, but a bag of assorted craft buttons from any craft store gets you most of the way there for under five dollars.
EDITOR’S PICK
🛒Vintage Button Cluster Ornaments
Glue a cluster of mismatched vintage-style buttons in cream, brass, and muted red tones onto a small wooden disc or felt circle base, layering them so edges slightly overlap.
(paid link)
10. Sponge-Painted Ombre Ornaments
Using a small makeup sponge, dab two coordinating shades of acrylic paint (like blush and cream, or forest and sage) onto a glass or foam ball, blending where the colors meet with a light circular motion. Work from the bottom up so the darker shade sits at the base and fades upward, mimicking a professional ombre dip technique without needing to actually dip anything. Seal with a light matte spray varnish once fully dry to protect the finish and give it a soft, non-shiny texture that looks intentionally muted rather than homemade. This technique is genuinely one of the fastest on this list once you’ve done two or three.
EDITOR’S PICK
🛒Sponge-Painted Ombre Ornaments
Using a small makeup sponge, dab two coordinating shades of acrylic paint (like blush and cream, or forest and sage) onto a glass or foam ball, blending where the colors meet with a light circular motion.
(paid link)
11. Personalized Name Tag Ornaments
Write a name or short holiday word in a clean, simple script onto a small wood slice or plain white ornament disc using a fine paint pen, then add a thin gold border around the edge for polish. The trick to avoiding a “kids’ craft table” look is sticking to one elegant font style throughout and keeping the lettering small and centered rather than filling the whole surface. These work beautifully as place-card ornaments at a holiday dinner table, doubling as both decor and a functional seating marker. A steady hand matters more than artistic skill here, so practice the lettering on scrap paper first.
EDITOR’S PICK
🛒Personalized Name Tag Ornaments
Write a name or short holiday word in a clean, simple script onto a small wood slice or plain white ornament disc using a fine paint pen, then add a thin gold border around the edge for polish.
(paid link)
12. Pinecone and Twine Rustic Ornaments
Dip the tips of small real or faux pinecones in white acrylic paint to mimic a light dusting of snow, then wrap the base in natural jute twine finished with a simple bow. This ornament leans fully into a farmhouse or cabin aesthetic, and it pairs exceptionally well with the natural, textural style covered in our farmhouse-focused decor content if that’s the direction your tree is heading. Letting the paint drip slightly and dry in an uneven pattern actually looks more convincing than a perfectly even coat, since real snow never falls in a flawless line anyway.
EDITOR’S PICK
🛒Pinecone and Twine Rustic Ornaments
Dip the tips of small real or faux pinecones in white acrylic paint to mimic a light dusting of snow, then wrap the base in natural jute twine finished with a simple bow.
(paid link)
13. Layered Glitter Dip Ornaments
Brush a thin layer of clear-drying craft glue onto the bottom third of a glass ball, then dip it into fine, non-chunky glitter in a champagne or pewter tone, tapping off the excess over a bowl. Repeat with a second, thinner layer once the first has dried for a subtle ombre-glitter effect rather than an all-over sparkle bomb. Fine glitter in a muted metallic shade reads as expensive; large chunky glitter in bright colors reads as a school project, so this is one place where product choice matters more than technique. Let these cure fully overnight on a protected surface before hanging.
EDITOR’S PICK
🛒Layered Glitter Dip Ornaments
Brush a thin layer of clear-drying craft glue onto the bottom third of a glass ball, then dip it into fine, non-chunky glitter in a champagne or pewter tone, tapping off the excess over a bowl.
(paid link)

14. Miniature Gift Box Ornaments
Wrap tiny cardboard boxes (available cheaply at craft stores in bulk) in coordinating wrapping paper scraps, tying each with a slim ribbon and a small faux sprig tucked under the bow. These miniature “presents under the tree, on the tree” ornaments are a clever way to use up leftover wrapping paper from prior years, and grouping five or six in a cluster on one branch creates a genuinely eye-catching focal point. Keep the wrapping paper patterns within the same two or three colors so the cluster looks curated rather than like leftover scraps thrown together.
EDITOR’S PICK
🛒Miniature Gift Box Ornaments
Wrap tiny cardboard boxes (available cheaply at craft stores in bulk) in coordinating wrapping paper scraps, tying each with a slim ribbon and a small faux sprig tucked under the bow.
(paid link)
15. Pressed Botanical Resin Ornaments
Press small dried flowers, ferns, or leaves flat between parchment paper and a heavy book for about a week, then set them into a clear resin ornament mold following the resin kit’s curing instructions. This is a slightly more advanced project, but the payoff is an ornament that looks genuinely like it came from an artisan shop charging $25 or more. Add a thin gold cap and hanging loop once the resin has fully cured (usually 24–72 hours depending on the product). These make especially meaningful ornaments if you press flowers from a special occasion earlier in the year.
EDITOR’S PICK
🛒Pressed Botanical Resin Ornaments
Press small dried flowers, ferns, or leaves flat between parchment paper and a heavy book for about a week, then set them into a clear resin ornament mold following the resin kit’s curing instructions.
(paid link)
16. Chalk Paint Cottage Ornaments
Coat a wooden ornament blank or thick cardboard cutout in matte chalk paint, then lightly sand the edges once dry to reveal a hint of the material underneath for a soft, worn-in look. Cottage-style decor relies heavily on this kind of gentle imperfection, so resist the urge to make the sanding too even or too clean. A simple house, heart, or star shape works best for this technique since the chalky texture is the star of the piece, not intricate detail. Finish with a light coat of matte sealant to keep the chalky finish from rubbing off in storage. For more ways to stretch a decorating budget without it looking that way, our dollar store Christmas decor ideas that look expensive use a lot of these same low-cost upgrade tricks.
EDITOR’S PICK
🛒Chalk Paint Cottage Ornaments
Coat a wooden ornament blank or thick cardboard cutout in matte chalk paint, then lightly sand the edges once dry to reveal a hint of the material underneath for a soft, worn-in look.
(paid link)
17. Faux Fur Pom-Pom Ornaments
Cut small circles of faux fur fabric, gather the edges with a needle and thread, and stuff lightly before pulling tight to form a soft pom-pom ball. Attach a slim ribbon loop at the top and consider adding a tiny bell inside before closing for a subtle jingle when the tree is disturbed. White or cream faux fur pom-poms look genuinely luxurious next to glass and metallic ornaments, adding a soft textural contrast that boutique tree stylists rely on heavily. These are also a great project for using up faux fur fabric scraps left over from other decor projects.
EDITOR’S PICK
🛒Faux Fur Pom-Pom Ornaments
Cut small circles of faux fur fabric, gather the edges with a needle and thread, and stuff lightly before pulling tight to form a soft pom-pom ball.
(paid link)
18. Watercolor Wash Glass Ornaments
Thin acrylic paint with a bit of water until it’s translucent, then swirl a small amount inside a clear glass ball, rotating to coat the interior in a soft wash of color rather than a solid opaque layer. Try dusty blue, blush pink, or sage green for a dreamy, watercolor-style effect that lets light pass through beautifully when hung near a window. This is one of the more forgiving techniques on the list since imperfections in the swirl pattern actually add to the handmade-artisan look rather than detracting from it. Let dry fully upside down before capping.
EDITOR’S PICK
🛒Watercolor Wash Glass Ornaments
Thin acrylic paint with a bit of water until it’s translucent, then swirl a small amount inside a clear glass ball, rotating to coat the interior in a soft wash of color rather than a solid opaque layer.
(paid link)
19. Fabric-Wrapped Thread Ornaments
Wrap embroidery floss or thin fabric strips tightly around a foam ball in a single color or a two-tone pattern, securing the ends with a dab of glue tucked underneath. Metallic gold or silver thread against a cream or burgundy base creates a rich, tactile ornament that looks far more expensive than the few dollars of thread it actually costs. Keep the wrapping tension consistent throughout so the surface stays smooth rather than lumpy, which is the main thing separating a polished result from an obviously homemade one.
EDITOR’S PICK
🛒Fabric-Wrapped Thread Ornaments
Wrap embroidery floss or thin fabric strips tightly around a foam ball in a single color or a two-tone pattern, securing the ends with a dab of glue tucked underneath.
(paid link)
20. Metallic Marbled Clay Ornaments
Knead two colors of air-dry clay together just enough to create a marbled swirl pattern without fully blending them, then roll flat and cut into simple shapes like circles, stars, or hexagons using cookie cutters. Once dry, brush the raised edges lightly with metallic gold or copper paint to catch the light. Poke a hanging hole before the clay fully hardens, not after. These have a genuinely modern, boutique-ceramics look that fits especially well on minimalist or Scandinavian-style trees, and the clay itself costs only a few dollars for a batch large enough to make a dozen ornaments.
EDITOR’S PICK
🛒Metallic Marbled Clay Ornaments
Knead two colors of air-dry clay together just enough to create a marbled swirl pattern without fully blending them, then roll flat and cut into simple shapes like circles, stars, or hexagons using cookie cutters.
(paid link)
21. Mini Photo Frame Ornaments
Slide a small printed photo into a tiny gold or silver frame ornament (sold blank at most craft stores), choosing a warm-toned or black-and-white photo so the colors don’t clash with your tree’s palette. These make wonderful keepsake ornaments for family trees and are far more personal than anything you could buy pre-made. Keep the frame style consistent if you’re making several, since a mismatched jumble of frame finishes will undercut the polished look you’re going for. A small dab of glue on the frame’s back clasp keeps photos from slipping out during storage. If you gravitate toward a deeper, richer holiday palette, our burgundy Christmas decoration ideas pull from a similar moody color story.
EDITOR’S PICK
🛒Mini Photo Frame Ornaments
Slide a small printed photo into a tiny gold or silver frame ornament (sold blank at most craft stores), choosing a warm-toned or black-and-white photo so the colors don’t clash with your tree’s palette.
(paid link)
22. Sequin and Pearl Cluster Ornaments
Glue a small cluster of flat sequins and tiny faux pearls onto one section of a plain glass ball, leaving the rest of the surface bare rather than covering it entirely. This partial-coverage approach is what separates it from a craft-fair sequin ball gone overboard; the negative space is doing just as much visual work as the embellishment itself. Stick to a tone-on-tone palette, like all gold tones or all cream-and-pearl tones, rather than mixing several colors of sequins for a cleaner, more sophisticated result.
EDITOR’S PICK
🛒Sequin and Pearl Cluster Ornaments
Glue a small cluster of flat sequins and tiny faux pearls onto one section of a plain glass ball, leaving the rest of the surface bare rather than covering it entirely.
(paid link)
23. Faux Bois Painted Wood Slice Ornaments
Paint a thin wood slice ornament blank in a solid base color, then use a fine liner brush to add subtle woodgrain-style lines in a slightly darker shade once the base coat dries. This faux bois (fake wood grain) technique is a favorite among boutique decor brands because it looks intricate but is actually one of the more forgiving painting techniques to execute. A soft sage, dusty blue, or warm terracotta base color works beautifully against natural greenery, and the wood slice shape itself adds an organic, grounded note to a tree full of glass and metal pieces.
EDITOR’S PICK
🛒Faux Bois Painted Wood Slice Ornaments
Paint a thin wood slice ornament blank in a solid base color, then use a fine liner brush to add subtle woodgrain-style lines in a slightly darker shade once the base coat dries.
(paid link)
24. Ribbon Rosette Ball Ornaments
Fold a length of satin or velvet ribbon into small accordion pleats, then gather and glue the pleats into a rosette shape before attaching it to the top of a plain glass or foam ball. This technique takes a little practice but produces a genuinely stunning, textural focal ornament that looks like it belongs in a designer holiday collection. Use a color that pops against the rest of your tree, and consider making just three or four of these rather than a dozen, since a rosette ornament works best as a statement piece rather than a repeated pattern.
EDITOR’S PICK
🛒Ribbon Rosette Ball Ornaments
Fold a length of satin or velvet ribbon into small accordion pleats, then gather and glue the pleats into a rosette shape before attaching it to the top of a plain glass or foam ball.
(paid link)
Frequently Asked Questions
Conclusion
There’s a real difference between a tree that looks decorated and a tree that looks styled, and that difference almost always comes down to intention rather than budget. Once you’ve made even six or eight of these ornaments, you’ll likely notice your existing store-bought pieces start to look a little flat by comparison. Keep the leftover supplies on hand, because you’ll probably want to make more once friends and family start asking where you found them. This is genuinely one of the most rewarding low-cost ways to make a tree feel custom rather than store-generic.
💾 Save this post to your Pinterest Christmas ornaments board and come back to it when you’re ready to build your most beautiful tree yet!